Hacking Radio Remotes
Cheap wireless remotes are everywhere and the purpose of this article is to learn how most of them work, how secure they are and how to create your own in order to clone or extend an existing remote.

 The kind of remotes we are talking about are usually used for controlling lights, opening garage doors or gates, controlling thermostats or any other general purpose application. I hope in 2020 this article will be obsolete but in 2015 it works for 90% of the remotes.
The remote we’ll use here comes from a pretty new product class, the RGB LED controllers for individually addressable WS8211 LEDs. My intuition tells me that in a few years more people are going to use these but let’s hope I’m wrong.
Capturing the signal
 For capturing the signal I used a RTL-SDR dongle (RTL2832U) which can be bough for about $10 from the Internet. Everybody who is familiar with software defined radios know them well. For everybody else it’s important to understand what’s SDR and how this dongle can be used. Software defined radio, SDR, is the implementation of some radio components such as modulators, demodulators, filters and amplifiers in software instead of hardware. Because of this, with the proper software and the right configuration we should be able to demodulate and decode pretty much any signal in the frequency range which can be received by our radio.
A very important feature of our $10 dongle is that it’s frequency range is 24 - 1766 MHz. Within this range there are radio and TV signals as well as our remote signal, baby monitors, CB radios (such as those used by taxi) some GSM communication and a lot more. Nevertheless, my remote works on 433MHz and we’ll listen on that frequency.
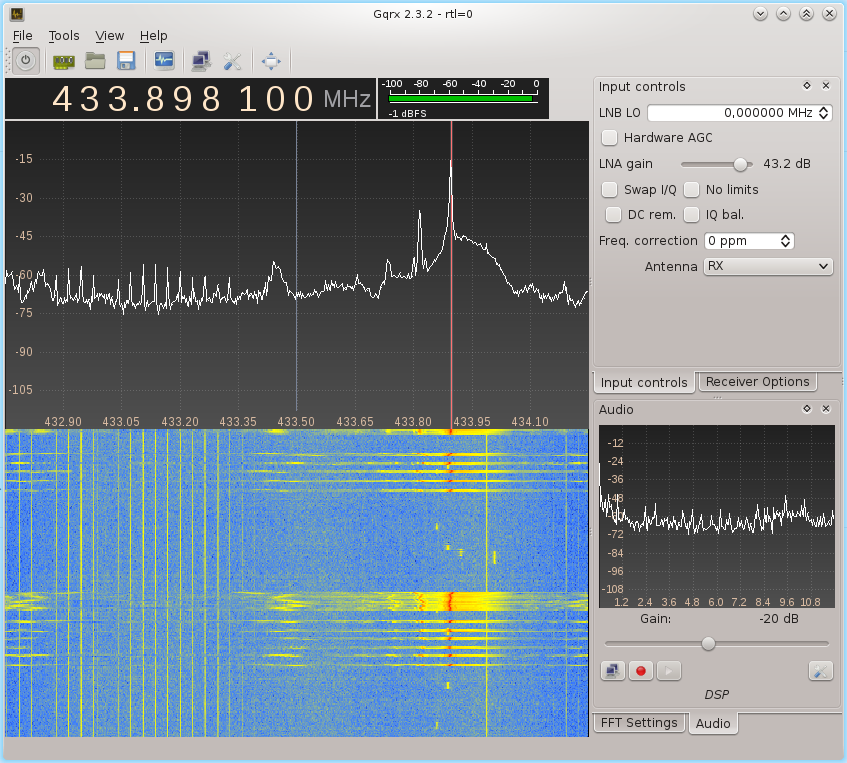
For software we have several options such as rtl-sdr, GNURadio and gqrx. I prefer to use gqrx because it is very easy to tune precisely to the right frequency with it’s FFT plot and waterfall display. Also it can record the signal to a WAV file which we can then import in Audacity to analyze.
Pressing a button on the remote while you are listening on 433MHz will show a strong signal on the waterfall display. You can now tune precisely on the right frequency. Another very common frequency is 315MHz and 90% of the remotes will use one of these. Also, the vast majority of these remotes use a form of amplitude modulation called OOK so we need to select AM in the Mode dropdown box in gqrx. Pressing a button on the remote should now produce some high pitch sounds. Record a couple of those key presses so we can analyze the data that is being transmitted.
Decoding the signal
For decoding those sounds we’ll use Audacity. We need to import that wave file and zoom right into our signal. After you select Waveform (dB) for that channel, it should look a little bit like this:
 With the classical method of eyeballing we can easily determine these are some bits which are either high or low.* This is called OOK modulation. Also by eye I translate this into bits. A fancy oscilloscope could do the translation automatically but I don’t have one so I’m going old school. The translated message looks like this:
 11100000000011101000111011101000100010001110100010001000100010001000111011101000 1000111010100011...
A huge part of this decoding is also figuring out the proper timing but it can easily be done in audacity. We need to zoom right to the smallest bit and measure it’s length. I prefer to go down to the samples level because that’s more precise.
 Here we can see that we recorded with a resolution of 48000 samples per second and that our bit has a length of 26 samples. With some quick math (1/48000*26) we determine that the bit lenght is 541 micorseconds.
Transmitting
For this we need a 433MHz RF transmitter which supports ASK modulation and a microcontroller. For the microcontroller I used an Arduino Nano board because it’s easy to program. Connecting is just power, ground and a digital pin to the data line, and then you go straight to coding.
#define TX_PIN 3
#define BIT_PERIOD 528
#define BITS 145

int OnOff[BITS] =   {1,1,1,0,0,0,0,0,0,0,0,0,1,1,1,0,1,0,0,0,1,1,1,0,1,1,1,0,1,0,0,0,1,0,0,0,1,0,0,0,1,1,1,0,1,0,0,0,1,0,0,0,1,0,0,0,1,0,0,0,1,0,0,0,1,0,0,0,1,1,1,0,1,1,1,0,1,0,0,0,   1,1,1,0,1,0,0,0,1,0,0,0,1,0,0,0,1,1,1,0,1,0,0,0,1,1,1,0,1,1,1,0,1,0,0,0,1,1,1,0,1,1,1,0,1,1,1,0,1,0,0,0,1,1,1,0,1,0,0,0,1,0,0,0};

int Red[BITS] =     {1,1,1,0,0,0,0,0,0,0,0,0,1,1,1,0,1,0,0,0,1,1,1,0,1,1,1,0,1,0,0,0,1,0,0,0,1,0,0,0,1,1,1,0,1,0,0,0,1,0,0,0,1,0,0,0,1,0,0,0,1,0,0,0,1,0,0,0,1,1,1,0,1,1,1,0,1,0,0,0,   1,0,0,0,1,1,1,0,1,0,0,0,1,0,0,0,1,0,0,0,1,1,1,0,1,0,0,0,1,1,1,0,1,1,1,0,1,0,0,0,1,1,1,0,1,1,1,0,1,1,1,0,1,0,0,0,1,1,1,0,1,0,0,0};
int Green[BITS] =   {1,1,1,0,0,0,0,0,0,0,0,0,1,1,1,0,1,0,0,0,1,1,1,0,1,1,1,0,1,0,0,0,1,0,0,0,1,0,0,0,1,1,1,0,1,0,0,0,1,0,0,0,1,0,0,0,1,0,0,0,1,0,0,0,1,0,0,0,1,1,1,0,1,1,1,0,1,0,0,0,   1,0,0,0,1,0,0,0,1,1,1,0,1,0,0,0,1,0,0,0,1,1,1,0,1,0,0,0,1,1,1,0,1,1,1,0,1,1,1,0,1,0,0,0,1,1,1,0,1,1,1,0,1,0,0,0,1,1,1,0,1,0,0,0};
int Blue[BITS] =    {1,1,1,0,0,0,0,0,0,0,0,0,1,1,1,0,1,0,0,0,1,1,1,0,1,1,1,0,1,0,0,0,1,0,0,0,1,0,0,0,1,1,1,0,1,0,0,0,1,0,0,0,1,0,0,0,1,0,0,0,1,0,0,0,1,0,0,0,1,1,1,0,1,1,1,0,1,0,0,0,   1,1,1,0,1,0,0,0,1,0,0,0,1,0,0,0,1,0,0,0,1,0,0,0,1,1,1,0,1,1,1,0,1,0,0,0,1,1,1,0,1,1,1,0,1,1,1,0,1,1,1,0,1,1,1,0,1,0,0,0,1,0,0,0};
int White[BITS] =   {1,1,1,0,0,0,0,0,0,0,0,0,1,1,1,0,1,0,0,0,1,1,1,0,1,1,1,0,1,0,0,0,1,0,0,0,1,0,0,0,1,1,1,0,1,0,0,0,1,0,0,0,1,0,0,0,1,0,0,0,1,0,0,0,1,0,0,0,1,1,1,0,1,1,1,0,1,0,0,0,   1,1,1,0,1,0,0,0,1,0,0,0,1,0,0,0,1,0,0,0,1,1,1,0,1,0,0,0,1,1,1,0,1,0,0,0,1,1,1,0,1,1,1,0,1,1,1,0,1,1,1,0,1,0,0,0,1,1,1,0,1,0,0,0};
int SpeedP[BITS] =  {1,1,1,0,0,0,0,0,0,0,0,0,1,1,1,0,1,0,0,0,1,1,1,0,1,1,1,0,1,0,0,0,1,0,0,0,1,0,0,0,1,1,1,0,1,0,0,0,1,0,0,0,1,0,0,0,1,0,0,0,1,0,0,0,1,0,0,0,1,1,1,0,1,1,1,0,1,0,0,0,   1,0,0,0,1,0,0,0,1,1,1,0,1,0,0,0,1,1,1,0,1,0,0,0,1,0,0,0,1,1,1,0,1,1,1,0,1,1,1,0,1,0,0,0,1,1,1,0,1,0,0,0,1,1,1,0,1,1,1,0,1,0,0,0};
int SpeedM[BITS] =  {1,1,1,0,0,0,0,0,0,0,0,0,1,1,1,0,1,0,0,0,1,1,1,0,1,1,1,0,1,0,0,0,1,0,0,0,1,0,0,0,1,1,1,0,1,0,0,0,1,0,0,0,1,0,0,0,1,0,0,0,1,0,0,0,1,0,0,0,1,1,1,0,1,1,1,0,1,0,0,0,   1,0,0,0,1,1,1,0,1,1,1,0,1,0,0,0,1,1,1,0,1,0,0,0,1,0,0,0,1,1,1,0,1,1,1,0,1,0,0,0,1,0,0,0,1,1,1,0,1,0,0,0,1,1,1,0,1,1,1,0,1,0,0,0};
int ModeP[BITS] =   {1,1,1,0,0,0,0,0,0,0,0,0,1,1,1,0,1,0,0,0,1,1,1,0,1,1,1,0,1,0,0,0,1,0,0,0,1,0,0,0,1,1,1,0,1,0,0,0,1,0,0,0,1,0,0,0,1,0,0,0,1,0,0,0,1,0,0,0,1,1,1,0,1,1,1,0,1,0,0,0,   1,0,0,0,1,1,1,0,1,1,1,0,1,0,0,0,1,1,1,0,1,0,0,0,1,1,1,0,1,1,1,0,1,1,1,0,1,0,0,0,1,0,0,0,1,1,1,0,1,0,0,0,1,1,1,0,1,0,0,0,1,0,0,0};


void setup()
{
  pinMode(TX_PIN, OUTPUT);

  // This is just for debugging purposes
  Serial.begin(115200);
}

void send_command()
{
  Serial.println("Boom!\n");

  // the remote sends our signal at least twice. Sending 4 times seems to be the most reliable.
  for (int j = 0; j < 4; j++)
  {
		on_off();
  }
  // Here we make sure we are not transmitting anything.
  digitalWrite(TX_PIN, LOW);
}

void on_off()
{
	for (int i = 0; i < BITS-1; i++)
	{
	    if (OnOff[i] != 0) {
		digitalWrite(TX_PIN, HIGH);
            } else {
		digitalWrite(TX_PIN, LOW);
            }
	    delayMicroseconds(BIT_PERIOD);
	}
}

void loop() {
  send_command();
  delay(1000);
}
As you can see this sample code is very easy. I actually decoded all the buttons from my remote but I am sending only one with the test code. Also you can notice that the first 80 bits from our signal is a preamble and then it follows the specific command. Also, this remote sends the message at least twice and I found out that sending it 4 times is even more reliable.
Below you can see the fabricated message captured and analyzed and if you look carefully you can see there is a lot less ripple at the top of the signal. In effect we are actually sending a better signal.

Now you can imagine that it would be possible to extend this so that I would create a smart remote which turns the LEDs certain colors for various notifications such as when Forex prices reach a certain value or when a Skype messages is received. In addition to that we could consolidate a bunch of these remotes into a single smarter remote that also adjusts heating, opens the garage door or whatever else you might find interesting.
Conclusion
Hacking this RF remote took a few hours and if we can do it, everybody from the neighborhood can do it. All the materials required could be bought for $15. NEVER use cheap wireless remotes for controlling things that you care about!
IR remotes are way safer because they don’t transmit in the hood. The reverse engineering is similar but you need to be there physically.
Footnotes:
- If you stare at this even more you could also draw the conclusion that it could be PWM with two different duty cicles of either 25% or 75%. Nevertheless the OOK modulation could easily accomodate this scenario because we just send 4 bits instead of one with a different duty cycle.